ubuntu18.04下安装ss-qt5并配置Chrome和Terminal科学上网
Windows 、Android、iOS都有比较成熟的GUI客户端实现shadowsocks穿墙,并且支持PAC和全局上网。Ubuntu上试用的客户端有3种,见下,配置流程比其他OS要复杂。
- shadowsocks
- shadowsocks-qt5
- electron-ssr
其中,
- shadowsocks在ubuntu上不区分server和client,没有GUI
- shadowsocks-qt5有GUI,但基本版本不支持chacha20-ietf-poly1305加密协议,网上有人在原有基础上添加了该加密协议(https://www.shangyexin.com/2018/04/20/shadowsocks-qt5/ )
- electron-ssr有GUI,支持chacha20-ietf-poly1305加密协议 在github上的项目被作者删除,不明原因。但网上有backup(https://github.com/qingshuisiyuan/electron-ssr-backup)
本文采用shadowsocks-qt5,并配置Chrome和Terminal,实现科学上网。
安装shadowsocks-qt5
shadowsocks-qt5 (简称ss-qt5)需要通过PPA源安装,仅支持Ubuntu 14.04或更高版本。
设置 PPA 源并安装 shadowsocks-qt5
sudo add-apt-repository ppa:hzwhuang/ss-qt5
sudo apt-get update
sudo apt-get -f install libappindicator1 libindicator7
sudo apt-get install shadowsocks-qt5
如果有报错的话运行
sudo vim /etc/apt/sources.list.d/hzwhuang-ubuntu-ss-qt5-bionic.list
将修改bionic为xenial
deb http://ppa.launchpad.net/hzwhuang/ss-qt5/ubuntu bionic main
deb http://ppa.launchpad.net/hzwhuang/ss-qt5/ubuntu xenial main
配置Chrome
ss连上之后,chrome无法上网,还要设置Ubuntu的网络代理。点击Settings->Network->Network Proxy->Manual,进行如下配置:
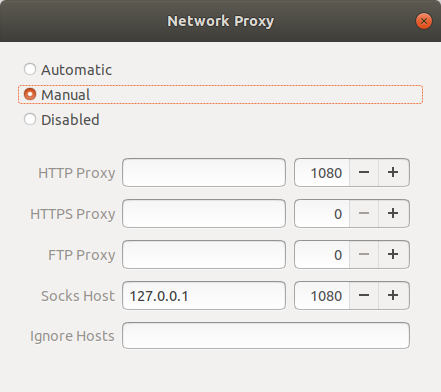
此时,Chrome已可上网。
添加ss至开机启动
为了方便,可以将Shadowsocks添加到开机启动,执行下面的命令:
gnome-session-properties
弹出的对话框中点击Add,添加ss-qt5的启动项,例如:
Name: shadowsocks-qt5
Command: /usr/bin/ss-qt5
Comment: shadowsocks-qt5
配置Terminal
配置了系统的全局代理,但Terminal还是无法穿墙。 因为,Terminal只支持http、https协议,而ShadowSocks使用的是socks协议 如何规避,可以使用Privoxy来将http和socks相互转换。
Privoxy是一款带过滤功能的代理服务器,针对HTTP、HTTPS协议。通过Privoxy的过滤功能,用户可以保护隐私、对网页内容进行过滤、管理cookies,以及拦阻各种广告等。Privoxy可以用作单机,也可以应用到多用户的网络。 修改HTTP请求头的字段,如referrer和user agent,从而隐藏用户上一个查看的网页和用户正在使用的浏览器
安装Privoxy
使用下面的命令安装Privoxy:
sudo apt-get install privoxy
配置Privoxy
安装完毕后,打开Privoxy的配置文件/etc/privoxy/config(配置文件非常大):
sudo vim /etc/privoxy/config
首先,定位 4.1. listen-address 这一节,找到监听的端口,通常是8118:
#        listen-address  192.168.0.1:8118
#
#      Suppose you are running Privoxy on an IPv6-capable machine and
#      you want it to listen on the IPv6 address of the loopback
#      device:
#
#        listen-address [::1]:8118
#
listen-address  127.0.0.1:8118
listen-address  [::1]:8118
#
#  4.2. toggle
#  ============
#
#  Specifies:
#
#      Initial state of "toggle" status
接着,在 5.2. forward-socks4, forward-socks4a, forward-socks5 and forward-socks5t 这一节,加上如下配置,注意最后有一个点号” .”:
#        forward           127.*.*.*/     .
#
#      Unencrypted connections to systems in these address ranges
#      will be as (un)secure as the local network is, but the
#      alternative is that you can't reach the local network through
#      Privoxy at all. Of course this may actually be desired and
#      there is no reason to make these exceptions if you aren't sure
#      you need them.
#
#      If you also want to be able to reach servers in your local
#      network by using their names, you will need additional
#      exceptions that look like this:
#
#       forward           localhost/     .
#
forward-socks5 / 127.0.0.1:1080 .
#
#  5.3. forwarded-connect-retries
保存后,重启Privoxy:
sudo /etc/init.d/privoxy restart
接着配置终端的环境,打开终端配置文件:
sudo vim ~/.bashrc
在末尾追加 http_proxy 和 https_proxy:
# enable programmable completion features (you don't need to enable
# this, if it's already enabled in /etc/bash.bashrc and /etc/profile
# sources /etc/bash.bashrc).
if ! shopt -oq posix; then
  if [ -f /usr/share/bash-completion/bash_completion ]; then
    . /usr/share/bash-completion/bash_completion
  elif [ -f /etc/bash_completion ]; then
    . /etc/bash_completion
  fi
fi

# add by XXX for termimal proxy 2020-02-06
export http_proxy="127.0.0.1:8118"
export https_proxy="127.0.0.1:8118"
保存文件后,重启终端或者执行下面的命令重新读取配置文件:
source ~/.bashrc
测试穿墙是否成功:
~$ wget http://www.google.com
ww.google.com
--2020-02-06 11:51:29--  http://www.google.com/
Connecting to 127.0.0.1:8118... connected.
Proxy request sent, awaiting response... 200 OK
Length: 11986 (12K) [text/html]
Saving to: ‘index.html’

index.html        100%[===================>]  11.71K  --.-KB/s    in 0s

2020-02-06 11:51:29 (89.4 MB/s) - ‘index.html’ saved [11986/11986]
到这里,就实现了Terminal的穿墙。
Pivoxy添加开机启动
可将Privoxy添加到开机启动,ubuntu18.04 没有/etc/rc/local,需要自己手动添加
sudo vim /lib/systemd/system/rc.local.service
一般启动文件由三个部分组成:
[Unit]段: 启动顺序与依赖关系
[Service] 段: 启动行为,如何启动,启动类型
[Install] 段: 定义如何安装这个配置文件,即怎样做到开机启动
rc.local.service中缺少[Install],手动添加进去
[Install]
WantedBy=multi-user.target
Alias=rc-local.service
创建 /etc/rc.local,将需要启动的命令加入其中
#!/bin/sh -e
#
# rc.local
#
# This script is executed at the end of each multiuser runlevel.
# Make sure that the script will "exit 0" on success or any other
# value on error.
#
# In order to enable or disable this script just change the execution
# bits.
#
# By default this script does nothing.

sudo /etc/init.d/privoxy start
exit 0
给rc.local加可执行权限
sudo chmod +x /etc/rc.local
systemd 默认读取 /etc/systemd/system 下的配置文件, 所以还需要在 /etc/systemd/system 目录下创建软链接
sudo ln -s /lib/systemd/system/rc.local.service /etc/systemd/system/

- CentOS8服务器上部署Docker memos+Nginx反向代理实现外网访问
- macOS搭建Apache2.4 + PHP7.3 + MySQL8.0 + ThinkPHP6.0开发环境
- macOS系统Apache配置虚拟主机vhost
- Win10下部署Apache+PHP+MySQL环境
- ubuntu18.04下安装ss-qt5并配置Chrome和Terminal科学上网
- 一个定制微信朋友圈截图的小程序示例
- Windows上RobotFramework&RIDE的环境部署
- [解决]Github pages 无法自动更新
- 利用 Github Pages 搭建博客
- Windows上部署Jekyll